Showing posts with label Filipino Food. Show all posts

Wednesday, June 26, 2013

Beef Caldereta

        Special occasions call for special occasion food. In the Philippines, we sometimes refer to special occasion dishes as Fiesta Fare. Fiesta is a Spanish word which means festival. And of course, after 300 years of Spanish occupation, a lot of our dishes took on Spanish influences.


        There are as many versions of Beef Caldereta as there are regions in the country. Some like it hot, so they add hot peppers. Purists use only the annato seeds or fresh tomato puree to give it its characteristic color. Still some have added olives and cheese to the recipe. But this is one dish easily recognizable on any table spread as it commands a place of importance and avid patronage being one of the more expensive dishes on the Filipino table. Though, an acceptable alternative to use is goat meat, but with additional preparation steps to get rid of the fishy goat smell. (I.e. washing and or boiling raw goat meat in vinegar, or including 7-Up or Sprite in the ingredients or both.

Cheesy Beef Caldereta

        The Beef Caldereta I made was one a friend taught me 10 years ago. I attended one occasion in her home and she served Beef Caldereta, among others. So before leaving, I begged her to give me her recipe for Beef Caldereta. Soon enough, when I had the chance, I tried the recipe, and it was awesome!


        So, if you're wanting to impress guests coming over for dinner, try making them a classic Filipino 'wow' dish like this one.


INGREDIENTS:

1 kg. lean beef meat, sliced into 1 inch chunks
1 225 g. bar cheese, sliced into cubes
1 1/2 cup potatoes, cut into chunks
1 cup carrot chunks
1/2 cup green peas
1 cup tomato paste
1 laurel leaf
1 cup pineapple chunks
3 cloves garlic, minced
1 whole red onion, quartered
1 red and green bell pepper, sliced
salt and pepper to taste
Caldereta veggies

PROCEDURE:

1. Place beef in enough water to cover and pressure cook for about 35 minutes or boil until tender. ( Remove scum that forms in the early stages of boiling.) Add water as necessary.

2. In a little oil, brown the potatoes, set aside. Brown the garlic and add onions. Wait until onions turn transparent then add the beef and stock. Add the laurel leaf, potatoes and carrots and cook until the vegetables are almost tender.
browned potatoes

3. Add the tomato paste and pineapple chunks. Season with pepper and stir in cheese cubes. Add red and green bell peppers, pineapple chunks and green peas. Adjust seasonings. Adding salt only if the cheese has not given you the right cheesy, creamy sauce.

Serve hot or on a chaffing dish along with other special dishes. Freeze leftovers in freezer bags.
Cheesy Beef Caldereta closeup

Tuesday, June 25, 2013

Max's Fried Chicken

        I was so preoccupied with guests coming over today that I wasn't able to post about my Molo Soup. Today, June 25th, happened to be my eldest daughter's 18th birthday. 

        In May of this year, Erika came to me saying she doesn't really need to have a big party for her 18th birthday. Surprised, I asked what's going on, and she said sheepishly that she still felt immature, that a coming-of-age-party will only force her to be someone she is not ready to become yet. And then she says, " can we have it next year, na lang? So I asked her, "you mean you're going to make 19 the new 18? "Pretty much!"was the quick answer. And so that settled the issue.

        Mother and daughter decided we were going to plan for that belated coming out party. She was to take her skin and hair to the next level, and I was going to make sure her teeth will be all ready for the event next year. ( Those three aspects need work)

        But still her friends from college will want to come over and raid the kitchen, so I  asked who was coming, and how many they were. I opted not to post a new recipe last night and planned for tonight's dinner instead.

        I decided on Beef Caldereta, Max's Fried Chicken, Bam-I, and Lumpia Shanghai with rice for the meal and Buko Pandan for the drinks and Maja Blanca for dessert.

        I first tried making Max's Fried Chicken for Christmas dinner last year. Because the kids and my two nephews are Fried Chicken lovers, there must always be the likeness of fried chicken at any special occasion. 
my Max's Fried Chicken

        I like this recipe because it's so simple to make and delivers great results every time. The chicken is always licked to the bone, and there are no leftovers. 

        Max's Restaurant is an iconic landmark in the Philippine Foodscape. Beginning in 1945, after World War 11 when Maximo Gimenez, a Stanford -educated Filipino teacher was befriended by American soldiers.

        The soldiers went over to his house often for a drink or two. Soon after, they started paying for their drinks and the chicken and steak being served to them. Maximo opened his cafe, and not too long after, the Filipino public came to know about the tender, juicy and tasty chicken, hence Max's Restaurant was born.

        With branches all over the country and abroad, Max's Fried Chicken has won over fans from all over.

        As I searched the internet for international branches; I found ones in California, Canada, Hawaii, Nevada and New Jersey in the US and United Arab Emirates in the Middle East. Luckily, we can now recreate the greaseless, crispy, juicy taste right at home.

INGREDIENTS:
3 simple ingredients

1 Spring chicken
1/4 cup  chopped cilantro or parsley ( kinchay)
6 pcs bay leaves
4 cups water
2 tsp salt
1 tsp ground black pepper
oil for deep frying
1 or 2 camote (sweet potatoes), peeled and sliced into wedges

PROCEDURE:

1. Boil 4 cups water in a steamer, add the cilantro and bay leaves. Place cleaned whole chicken on steamer plate and steam 45 minutes.
After steaming

2. Remove from steamer and let cool and allow to drip on a rack placed over a plate.

3. Mix salt and pepper in a small bowl and rub all over, inside and outside the steamed chicken.

4. Heat oi until hot enough. Deep fry 12 minutes until golden brown. Remove from heat and drain excess oil. Fry camote wedges, Drain excess oil with paper towels.
one side done

browning some more

5. Plate the whole fried chicken with the camote fries and banana catsup for a truly authentic Max's experience.
yum, yum, yum!

tasty, juicy and crispy and greaseless!


NOTE: The only way to eat this of course, is with your hands, and with rice. Authentic Filipino Fried Chicken recipe born after the war and loved by many. I hope you try this one. This is a sure winner!

I served the Max's Fried Chicken with Lumpia Shanghai cut into 4's for  crisper results. And I made two because obviously one would not be enough.  

Am able to post now as the guests have left, no more Caldereta or Max's Fried Chicken. Told you, no leftovers! Much love...and thanks for visiting.

Saturday, June 22, 2013

Atchara or Pickled Papaya ( Green Papaya Relish)

        Hey Guys! I went to Bansalan yesterday, its some 70 something kilometers, and two hours away from Davao City to attend the wake of my husband's uncle. I saw and took pictures of a week-old calf and was able to bring home two freshly picked pineapples and two green papayas for Papaya Pickle or Atcharang Papaya. We also took some 6 pineapple crowns for planting tomorrow morning.
Atchara

        Atchara or Papaya Pickle is a ubiquitous Filipino salad and side dish, served usually with Tapsilog and Barbeque dishes. It nicely rounds up all salty and fatty dishes with its sweet-sour taste. Try making some for your next barbeque, you will most definitely be reaching for it every occasion you get . Though technically a pickle, this is not used like your cucumber pickle as ingredients for relishes or sandwiches, but served alongside rice and main dishes that are either fried or grilled.

        This relish appears from breakfast, all the way to dinner. From the sidewalk eateries to the classiest of restaurants, Atchara will remain to be the most popular of Filipino relishes.

INGREDIENTS:

Atchara ingredients

Green unripe papaya

Grated papaya

4 c. grated unripe papaya
1 carrot, sliced thinly
1 red bell pepper
2 red onions, sliced
3 T. salt
1 thumb-sized ginger, sliced
2 c vinegar ( Apple Cider or white coconut vinegar )
1 1/2 c. white sugar
2 tsp. salt


PROCEDURE:

1. Sprinkle 3 T salt on grated papaya, knead to extract the bitterness from the papain juices. Let stand 30 minutes to dehydrate the papaya.
the whole batch reacting with salt

2. Squeeze the juices from papaya, and discard. Rinse over a strainer under running water, kneading some more. Squeeze all the liquid from the papaya. Alternately, get a piece of cheesecloth and squeeze every cupful to remove the last traces of liquid. Or, you may also use the laundry spinner which does a mighty great job, too.
squeezed

3. In a pot, boil vinegar, sugar and 2 tsp salt until sugar is fully dissolved. Add the vegetables and let boil a little to cook vegetables. Turn off heat and remove from fire.

4. While still hot, arrange the atchara inside sterilized bottles. Seal and cool completely and store in the refrigerator. Some folks cure the atchara for 3 days to a week to develop its taste. Atchara that is at least 3 days old in the fridge tastes best. I made four bottles.
bottled atchara
a small serving

Serving suggestions:
Grilled chops with java rice, dipping sauce and atchara


Crispy pata and atchara, pinakurat and soy sauce

Lechon Kawali, lechon sauce and atchara

Chicken barbecue and Atchara

Grilled chops, java rice, Atchara

Pork Barbecue, java rice and Atchara


AND, just before I forget, the pictures of the week-old calf  with its mother and m
y take home pineapples.
calf and mom on a Bansalan farm

Wednesday, June 19, 2013

Chicken Afritada

It's been cloudy these past four days. Folks in Manila are suffering from flooding due to heavy rains, and most of the classes have been suspended since Tuesday. Here in Davao, we experience scattered rainshowers, but no flooding.

Since it's a cloudy day, a great pick me-up would be a hearty chicken stew to warm both heart and tummy and please the eyes.

Chicken Afritada is a popular special occasion dish. It usually appears during Sunday meals, Fiesta celebrations and parties. It is always on menus for Filipino food and is a crowd pleaser.
Chicken Afritada

I remember growing up, my mom only cooked Chicken Afritada about four or five times in one year. She uses Dumalaga , any native chicken that's about to lay eggs, and so the stew would bear underdeveloped eggs that are basically just yolks, in various sizes. I didn't even mention how we looked forward to the rare times she served these.
Dumalaga=young lady chick, not quite a hen yet

When it was my turn to be mom, I decided to serve this dish at least once weekly. I thought, why designate such a delicious dish to just a few, rare appearances, when it is so easy to make and so freakin' delicious?

The kids agree, and they love this for lunch, dinner and for packed lunches. Matter of fact, when guests come over, they know I'll be serving these. The dish looks like you fussed, with the taste and the common knowledge that this is special occasion dish. But then, that will now be your secret, like it is mine.

So get ready for a most delicious fiesta fare right in your own kitchen, and wow guests for picnics with this authentic Filipino dish.


The sauce is to die for, so make sure to include at least 3 cups.

If you wish, you can use one whole native chicken, cleaned, cut up into serving pieces and pressure cooked for about 35 minutes. Cool until the pressure cooker can be opened, before starting on the dish. This means you might need another hour's head start to get the dish done on time.

If pressed for time, however, use a spring chicken, or dressed chicken breasts. For this recipe, I used one and a half chicken breasts. Use chicken fillets when making these for the elderly and very young children.

Lets' cook!

INGREDIENTS:
Afritada ingredients

1 pound or 500 g chicken breasts, cut into serving pieces
3 potatoes, peeled and quartered
1 carrot, sliced
1 red and 1 bell pepper, sliced
1 clove garlic, minced
1 small onion, sliced
1 tomato, sliced
salt and pepper to taste
1/2 cup green peas
1/2 cup pineapple chunks in syrup
1/4 cup breadcrumbs
1-2 tsp all purpose seasoning
2-3 T. tomato paste or 1 150 ml pouch tomato sauce

PROCEDURE:

1. Saute garlic, onions and tomatoes, add the chicken pieces and sprinkle salt on the meat. Toss to make sure the sauteed vegetables get their flavor into the meats. Cover and cook for about 5 minutes in medium heat.

2. The meat shall be cooking in its own juices. Add 2-3 cups water or the stock from which they were previously cooked in ( if using boiled, native chicken). Cover and cook further about 15-20 minutes.


3. Season with pepper and all purpose seasoning. Add the potatoes, carrots, pineapple, pineapple syrup and tomato paste. Add more to achieve the right red-orange color. Cook until vegetables are just tender.

4. Add the green peas and bell peppers. Taste your dish, the pineapple syrup should have added a hint of sweetness to the sauce. Adjust the seasonings, adding more salt or a little white sugar if the tomato paste is too sour. The dish should sport a sweet-salty-umami taste.

5. Add the breadcrumbs, boil until sauce just thickens, remove from fire and serve hot with steamed rice.

Easy Chicken Afritada
Enjoy!

Tuesday, June 18, 2013

Mango Concentrate ( Gina Mango Nectar Copycat )

        Yesterday's ice cream yielded one and a half gallon. The half gallon is gone, the gallon will be wiped out this afternoon, for sure.

        As I was clearing out the last few kilos of mangoes we put on display, I decided to make Mango Concentrate. Gina is the original and still the most popular brand of canned mango concentrate available in grocery stores. It is so thick and fruity delicious that restaurants serve an entire can, transferred to a tall glass with ice cubes, a mint sprig and bendy straw for a whopping price of $2!

        Since I am in possession of one of the world's sweetest mango varieties, I decided to do a copycat of Gina Mango Nectar.
Gina Mango Nectar
        This recipe is so easy to do. You may make these using citric acid as preservative, but I chose not to put any and go au naturelle and simply keep my concentrate in the fridge. The only specific instructions that must be followed is this: never let a drop of water touch the finished product. Make sure all equipment and storage bottles are bone dry prior to use. 
Mango Nectar/Concentrate

        For Moms who want only the very best for their schoolchildren, instead of packing foil-packed, store-bought juice drinks for kids, why not make your own fruit concentrates? Prepare your kid's drinking bottle the night before, by mixing in the concentrate with water, then freeze overnight. By the time recess bells rings, the juice has liquefied, is still cold and is fresh and all-natural! No artificial fruit colors or flavors and no additives.

        Did you know that certain food additives have been linked to hyperactivity in children? Below are images on Google of the dangers of putting food additives and coloring to food. My principle is simple: If food has an advertisement: its not REAL food.


This last one is my favorite, hilarious, but true!

Look familiar? they appear on our food labels

        I make mango, lemon, pineapple and guyabano concentrate to give the kids and myself, variety. Why buy powdered juice drink mixes or fruit-flavored tetrapacks when you can make these easily with real fruit and real vitamins? Besides, I would have to have something up my sleeve, in order to pull off weaning the family from drinking Carbonated drinks. Guess what? These were my weapons: real fruit concentrates, easily available, delicious, refreshing, easy to prepare. Who needs softdrinks when the fridge is full of fruit juices? We're now on our third month of softdrink freedom, YAY!

        Let's make Mango Concentrate! To make 1.5 liters pure concentrate or about 16 glasses of mango juice ( diluted ) for just 15 cents a glass:

INGREDIENTS:

4 cups ripe mango puree, run through a fine plastic sieve to remove tiny fibers
1-1/2 to 2 cups white sugar ( I used 1-1/2 c)
1 cup water ( I used 2 c because my mangoes are too sweet!)

PROCEDURE:

1. Boil the water and sugar until the latter is dissolved. It is not necessary to make a syrup out of it. Cool a little, about 5-8 minutes.

2. Add the mango puree, a cup at a time and stir together to completely mix the two. At this point, you may transfer the concentrate to sterilized glass bottles while hot, or to clean and dry plastic containers after it's cool enough not to melt the containers. Cool completely. Canners may can at this point.  For those who intend to use the concentrate within two weeks, may just seal the containers and refrigerate.

3. To serve: Fill a glass 2/3 full with the mango concentrate and top with ice cubes, a sprig of mint leaves and a bendy straw, or: for those who like it less sweet, add 2/3 cup ice water to a 1/3 cup of mango concentrate, stir and enjoy!
Samal mangoes in many forms: whole, sliced, concentrate and as fruit juice

NOTE: Without preservatives, the mango concentrate will last about 2 weeks refrigerated. Strictly using bone-dry equipment can make it last till the last drop. 

This is refreshing as a summer drink, tropical in flavor and color, sweet, exotic and luxurious at the same time.
Try serving these at your beach or pool gatherings for a touch of tropicalia

Go for REAL Food every time! Yes, too much sugar is not good for you, but real sugar is does not have the dangers of sugar substitutes like aspartame. Sugar in this case, acts as the food preservative. If another method of making fruit concentrates can be invented that doesn't use this much sugar would be very welcome, but until that time comes, I'm sticking with my fruit concentrates.

Monday, June 17, 2013

Homemade Mango Ice Cream ( No-cook, no eggs and no machine!)


I have yet to meet anyone who doesn't dig ice cream. Have you? I mean, from the very first time our moms introduced them to us as kids, we're hooked for life! Whatever they put into those creamy, luscious, cool stuff feels like heaven on earth, that no kid's birthday will ever be complete without it.

Fast forward to many years later, we have tasted so many different flavors, international and local. I could still remember when I was in elementary, mom and I went through a grocery isle and there were pouches of various flavors of instant ice cream mixes. The names excited me though I never figured out what they were. But I could not remember how they tasted, after we made them and soon enough, they were no longer available in groceries.

        When I was in high school, a lone Coney Island Ice Cream Scooping station opened in Davao City. I always went for Pistachio and Bubblegum flavors. But then, it closed shop in just two years.

       The original ice cream brand available locally then, was Magnolia, and flavors came in Ube ( Purple Yam), Vanilla, Mango, Macapuno, Halo-halo, Buko Salad and Chocolate.

        A few years later, Nestle launched its ice cream line and aside from the above flavors; Nestle introduced Cookies and Cream, Butterscotch, Rocky Road, Ube-Macapuno ( Purple Yam and Coconut Sport), Ube-Langka ( Purple Yam and Jackfruit), Double Dutch and Buko-Pandan ( Young Coconut and Screwpine).

        After these was a slew of new and more commercial brands like Sorbetero Pilipino Ice Cream, Arce Dairy, Magnolia Sorbetes and Selecta. 

      About 4 years ago, more affordable ice creams flooded the markets with two or more flavors combined in one small tub. When I tried them though, I had only one reaction: "what??? Noooo! this is not real ice cream!" Those taste like soft-serve ice cream and the flavors are chemical-tasting.

        So, as I was beginning to be more conscious of my family's health and the food I was serving, I avoided ice cream altogether. I thought if I could find a recipe for making them myself, I would certainly love that. Because I would know what they're made of.

        One day my mom handed me a note; someone gave it to her, an ice cream recipe that did not include eggs or cooking. Immediately, I went out to buy the ingredients and tried the recipe. It took me almost two days, simply because my freezer wasn't freezing food efficiently. I used mangoes because they were in abundance. When it was time to put the ice cream to the taste test; O.M.G! No more fake ice cream for me!

        Today we're making real ice cream with real ingredients, and real fruit. The recipe is very basic, you can change up the fruit anytime. I have made Cookies and Cream, Ube ( Purple Yam), Mango Float Ice Cream and Fruit Salad. 

        If your freezer is super efficient, the entire process will be done in 6 hours more or less. The actual prep time is only 45 minutes, tops. Its the freezing and defrosting and refreezing that will take up the most time.
Mango Ice Cream

So let's make the creamiest, freshest, silkiest homemade mango ice cream without an ice cream maker. The most equipment you will need would be a blender or food processor and if you have, a Kitchen Aid or hand mixer.

INGREDIENTS:
ice cream ingredients with mango on foreground

1 pound fresh fruit ( I used Samal variety mangoes ) half a kilo
2 250 ml. All Purpose Cream
2 cans 250 ml. Evaporated or Fresh milk
1-2 cans 350ml condensed milk 

PROCEDURE:

1. In a glass, stainless metal or plastic bowl, combine cream, milk and condensed milk. If using sweet/sour fruit like strawberries, use up both cans of condensed milk. As always, adjust the sweetness according to your taste. Stir to mix well. Freeze. ( You can do this at night before going to bed ). I used the Kitchen Aid bowl to freeze it fast.
icy mixture

2. Wash, peel, cut up your freshest fruits and puree using a blender or food processor. You may also slice more fruit into huge chunks for mixing in later. Set aside.

3. Remove the bowl from the freezer and let the bowl sit out on the table. Wait until the cream mixture is soft enough for the Kitchen Aid or hand mixer to whip. You will notice that the frozen mixture is icy and thick and dense. Beat at slow speed for a few minutes, and increase to high speed until the mixture has doubled in bulk. We are incorporating a lot of air to make the cream fluffy, airy and fine-textured. 
From less than half the bowl,


 to almost full, hooray for Kitchen Aid!

4. After about 10-15 minutes of high speed mixing, the mixture shall have taken a thick but fluffy texture. You will see that the tiny amount I scooped held its shape. Taste it to test if the texture is fine enough.
holding its shape

5. Divide the mixture into two tubs, add about 2 cups of fruit puree to each tub and fold. You may add food color if you wish. Cover the tubs and freeze. If adding chunks of fruit, let freeze an hour, and then take out to mix them in, and refreeze.
adding the puree
Done folding the mango puree and yellow food color

Freezing them into two tubs

6. Serve straight out of the freezer, any which manner you want, with  more fresh fruit, drizzles of ice cream topping or as is.
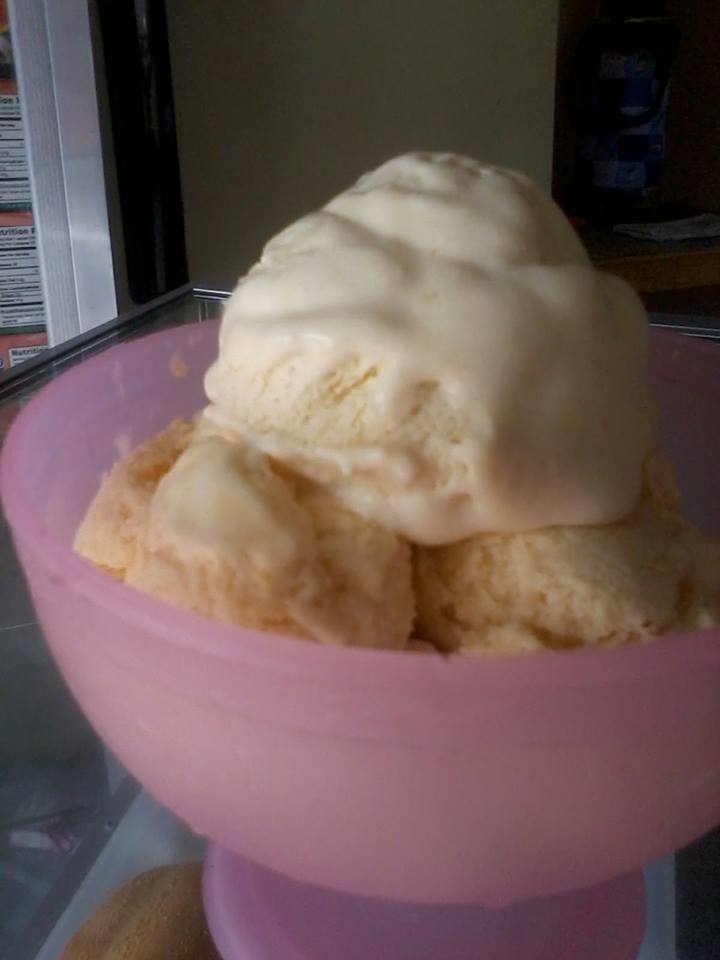
Luscious, fruity, fresh, silky homemade Mango Ice Cream

NOTE: For Cookies and Cream, I used a big pack of Oreos. I processed all, but three individual packs. These I broke off into large pieces. After folding in the powdered Oreos, stir in the huge chunks and freeze.

         For an ALL-FILIPINO parade of Ice Cream Flavors: 

        For Mango Float flavor, I broke chunks of Graham Crackers and plopped them into the tubs. Then added thin mango slices ( mango balls sink to the bottom ). After Freezing one hour, added more mango puree in a thin stream in a circling motion on the surface and then slightly, with a stroke or two, cut across the cream to swirl that in. Then froze the whole thing.

        For Buko Salad Ice Cream, a cup of young coconut strings and a cup of chopped, drained, canned fruit cocktail is mixed in, after re-freezing the whipped mixture. Vanilla flavoring and a little pink food color is added.
Buko Salad Ice cream

        For Buko Pandan Ice Cream, add 2 cups young coconut strings and a few drops of Pandan (Screwpine) Flavoring until you get the desired taste. Add a few drops of green food color until it has a mint tint.
Buko Pandan

           For Ube, Ube-Macapuno or Ube-Langka Ice Cream, add 2 cups boiled, pureed purple yam and a cup of either Macapuno (Coconut Sport) or sweetened jackfruit strings. For Ube-langka divide ice cream into two portions. Tint one yellow, and the other one violet food color, freeze slightly until it maybe scooped into a third large container alternately to create that swirl of color.
Ube-Macapuno Ice Cream

Ube-Langka

 If on your first attempt, the solid items settle at the bottom, cut your pieces smaller and add them in when the ice cream has some resistance to your mixing spoon.

        The flavors here are All-Filipino save for Cookies and Cream.

         My ice cream gets requested every time someone can think of an excuse. After you have tried homemade ice cream with real fruits, you will never look at grocery ice cream the same way again. You have come home to real, good, Filipino food. After trying our ice cream flavors, you might just become a Filipino food junkie too.

         Thank you for visiting and have a great summer everyone in the western world! 

NOTE: Before I forget! Although mangoes are much celebrated in my country, we avoid them when our throats are scratchy or feel that a cough is coming on. Mangoes, bless them, can aggravate these conditions. Otherwise, eat as much as you can!