Monday, June 17, 2013

Homemade Mango Ice Cream ( No-cook, no eggs and no machine!)


I have yet to meet anyone who doesn't dig ice cream. Have you? I mean, from the very first time our moms introduced them to us as kids, we're hooked for life! Whatever they put into those creamy, luscious, cool stuff feels like heaven on earth, that no kid's birthday will ever be complete without it.

Fast forward to many years later, we have tasted so many different flavors, international and local. I could still remember when I was in elementary, mom and I went through a grocery isle and there were pouches of various flavors of instant ice cream mixes. The names excited me though I never figured out what they were. But I could not remember how they tasted, after we made them and soon enough, they were no longer available in groceries.

        When I was in high school, a lone Coney Island Ice Cream Scooping station opened in Davao City. I always went for Pistachio and Bubblegum flavors. But then, it closed shop in just two years.

       The original ice cream brand available locally then, was Magnolia, and flavors came in Ube ( Purple Yam), Vanilla, Mango, Macapuno, Halo-halo, Buko Salad and Chocolate.

        A few years later, Nestle launched its ice cream line and aside from the above flavors; Nestle introduced Cookies and Cream, Butterscotch, Rocky Road, Ube-Macapuno ( Purple Yam and Coconut Sport), Ube-Langka ( Purple Yam and Jackfruit), Double Dutch and Buko-Pandan ( Young Coconut and Screwpine).

        After these was a slew of new and more commercial brands like Sorbetero Pilipino Ice Cream, Arce Dairy, Magnolia Sorbetes and Selecta. 

      About 4 years ago, more affordable ice creams flooded the markets with two or more flavors combined in one small tub. When I tried them though, I had only one reaction: "what??? Noooo! this is not real ice cream!" Those taste like soft-serve ice cream and the flavors are chemical-tasting.

        So, as I was beginning to be more conscious of my family's health and the food I was serving, I avoided ice cream altogether. I thought if I could find a recipe for making them myself, I would certainly love that. Because I would know what they're made of.

        One day my mom handed me a note; someone gave it to her, an ice cream recipe that did not include eggs or cooking. Immediately, I went out to buy the ingredients and tried the recipe. It took me almost two days, simply because my freezer wasn't freezing food efficiently. I used mangoes because they were in abundance. When it was time to put the ice cream to the taste test; O.M.G! No more fake ice cream for me!

        Today we're making real ice cream with real ingredients, and real fruit. The recipe is very basic, you can change up the fruit anytime. I have made Cookies and Cream, Ube ( Purple Yam), Mango Float Ice Cream and Fruit Salad. 

        If your freezer is super efficient, the entire process will be done in 6 hours more or less. The actual prep time is only 45 minutes, tops. Its the freezing and defrosting and refreezing that will take up the most time.
Mango Ice Cream

So let's make the creamiest, freshest, silkiest homemade mango ice cream without an ice cream maker. The most equipment you will need would be a blender or food processor and if you have, a Kitchen Aid or hand mixer.

INGREDIENTS:
ice cream ingredients with mango on foreground

1 pound fresh fruit ( I used Samal variety mangoes ) half a kilo
2 250 ml. All Purpose Cream
2 cans 250 ml. Evaporated or Fresh milk
1-2 cans 350ml condensed milk 

PROCEDURE:

1. In a glass, stainless metal or plastic bowl, combine cream, milk and condensed milk. If using sweet/sour fruit like strawberries, use up both cans of condensed milk. As always, adjust the sweetness according to your taste. Stir to mix well. Freeze. ( You can do this at night before going to bed ). I used the Kitchen Aid bowl to freeze it fast.
icy mixture

2. Wash, peel, cut up your freshest fruits and puree using a blender or food processor. You may also slice more fruit into huge chunks for mixing in later. Set aside.

3. Remove the bowl from the freezer and let the bowl sit out on the table. Wait until the cream mixture is soft enough for the Kitchen Aid or hand mixer to whip. You will notice that the frozen mixture is icy and thick and dense. Beat at slow speed for a few minutes, and increase to high speed until the mixture has doubled in bulk. We are incorporating a lot of air to make the cream fluffy, airy and fine-textured. 
From less than half the bowl,


 to almost full, hooray for Kitchen Aid!

4. After about 10-15 minutes of high speed mixing, the mixture shall have taken a thick but fluffy texture. You will see that the tiny amount I scooped held its shape. Taste it to test if the texture is fine enough.
holding its shape

5. Divide the mixture into two tubs, add about 2 cups of fruit puree to each tub and fold. You may add food color if you wish. Cover the tubs and freeze. If adding chunks of fruit, let freeze an hour, and then take out to mix them in, and refreeze.
adding the puree
Done folding the mango puree and yellow food color

Freezing them into two tubs

6. Serve straight out of the freezer, any which manner you want, with  more fresh fruit, drizzles of ice cream topping or as is.
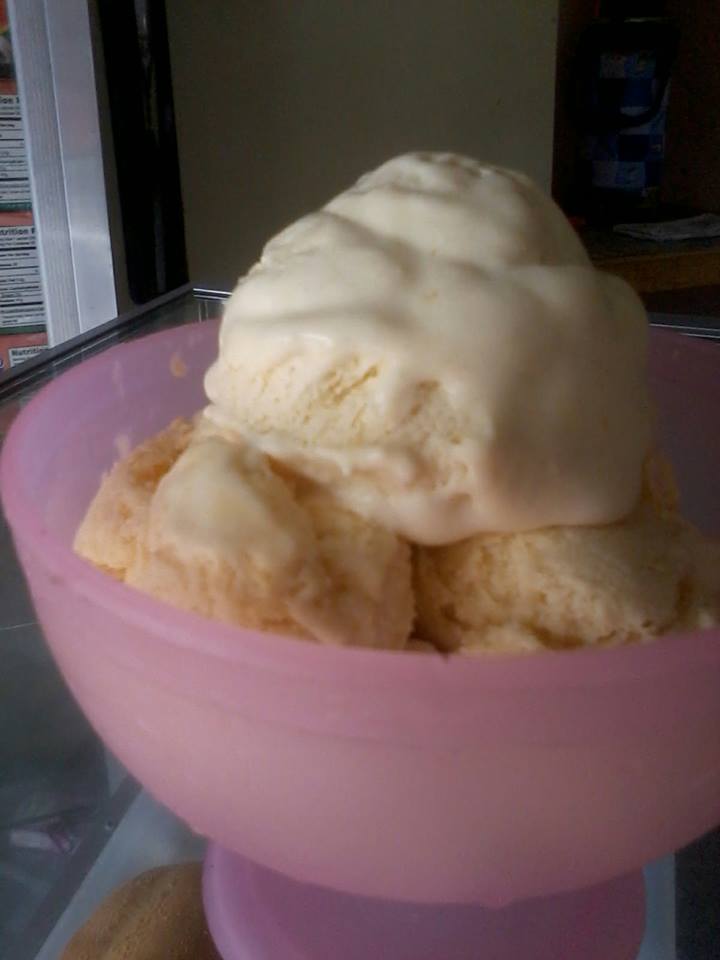
Luscious, fruity, fresh, silky homemade Mango Ice Cream

NOTE: For Cookies and Cream, I used a big pack of Oreos. I processed all, but three individual packs. These I broke off into large pieces. After folding in the powdered Oreos, stir in the huge chunks and freeze.

         For an ALL-FILIPINO parade of Ice Cream Flavors: 

        For Mango Float flavor, I broke chunks of Graham Crackers and plopped them into the tubs. Then added thin mango slices ( mango balls sink to the bottom ). After Freezing one hour, added more mango puree in a thin stream in a circling motion on the surface and then slightly, with a stroke or two, cut across the cream to swirl that in. Then froze the whole thing.

        For Buko Salad Ice Cream, a cup of young coconut strings and a cup of chopped, drained, canned fruit cocktail is mixed in, after re-freezing the whipped mixture. Vanilla flavoring and a little pink food color is added.
Buko Salad Ice cream

        For Buko Pandan Ice Cream, add 2 cups young coconut strings and a few drops of Pandan (Screwpine) Flavoring until you get the desired taste. Add a few drops of green food color until it has a mint tint.
Buko Pandan

           For Ube, Ube-Macapuno or Ube-Langka Ice Cream, add 2 cups boiled, pureed purple yam and a cup of either Macapuno (Coconut Sport) or sweetened jackfruit strings. For Ube-langka divide ice cream into two portions. Tint one yellow, and the other one violet food color, freeze slightly until it maybe scooped into a third large container alternately to create that swirl of color.
Ube-Macapuno Ice Cream

Ube-Langka

 If on your first attempt, the solid items settle at the bottom, cut your pieces smaller and add them in when the ice cream has some resistance to your mixing spoon.

        The flavors here are All-Filipino save for Cookies and Cream.

         My ice cream gets requested every time someone can think of an excuse. After you have tried homemade ice cream with real fruits, you will never look at grocery ice cream the same way again. You have come home to real, good, Filipino food. After trying our ice cream flavors, you might just become a Filipino food junkie too.

         Thank you for visiting and have a great summer everyone in the western world! 

NOTE: Before I forget! Although mangoes are much celebrated in my country, we avoid them when our throats are scratchy or feel that a cough is coming on. Mangoes, bless them, can aggravate these conditions. Otherwise, eat as much as you can!


Sunday, June 16, 2013

Mango Float ( Refrigerator Cake )

Happy Fathers Day to all! How about a tropical flavor to present to Dad's? Mango Float is superb in taste and decadent, but easy to make. 


I'm showing off my display of Samal Mangoes on display in front of the house now. And the previous pics when we had just harvested them on June 12th, and when I was packing them in large baskets, for ripening.

newly arrived harvest, 9 large basketfuls

yep, that's my knees!

me, being camera -shy

Large sized Samal Mangoes

Medium Sized Samal Mangoes

Today we're making Mango Float, a very popular dessert for special occasions here in the country. I'm using our harvest of super sweet Mangoes.
Mango Float

Most Filipino housewives and teenagers know how to make these as they're easy to put together. The amount of condensed milk to be used should vary depending on the sweetness of the mango used. In my case, I used half of a big can of condensed milk as I prefer our Mango Float to taste just like Ice Cream.

Let's make Mango Float!
Mango Float 

INGREDIENTS:

3-4 large, ripe mangoes, peeled and sliced 1/4 inch thick or formed into balls
1-2 packs Graham Crackers biscuits
2 cartons All Purpose Cream 250 ml. each or 2 cups
1 big can Condensed milk
Mango Float Ingredients

PROCEDURE:

1. Line a glass dish with graham cracker biscuits. I used Pyrex large rectangular dish. Cut some biscuits to cover entire surface. Set aside.

2. In a bowl, combine cream and condensed milk. Adjust the sweetness if your mango variety is very sweet. ( You wouldn't want a sugar overload! )Pour half of this mixture on the graham crackers.

3. Arrange the mango slices closely together. It would be a good idea to use the off-cuts from the seeds, Leave little if any space in between.

4. Repeat layering the graham crackers and the rest of the cream. This time, arrange the more uniform-sized mango slices on top. Optional steps would be to drizzle with chocolate syrup or sprinkle powdered grahams to cover. Refrigerate to set, 1-2 hours.
Mango float

5. To serve: slice into squares and serve.
Is that decadent, or what?
 Happy Eating!


Saturday, June 15, 2013

Homemade Tinapa ( Smoked Fish without a Smoker )

        Tinapa is Smoked Fish of any variety. Usually sold in public markets are varieties of small fish, sardines, milkfish and round scad. I can almost guarantee that most of my countrymen are not aware that an appliance such as a smoker exists. Not because we might have no use for them but because there is no demand, so manufacturers don't sell any of them here in my country. Besides, smoked fish can be bought for cheap and is readily available all over the country.

     Last April, I searched the local classifieds for smoking machines or home smokers and found industrial sized appliances. After which, I scoured the internet for smoking recipes. There were tons with video instructions using a smoker and a grill but I searched for a tutorial on home smoking without the equipment. And luckily, I found one! The reason I knew something like this was out there was, I read my mom's vintage recipe book which simply asked for teabags and rice. 

        If you have a smoker at home, by all means use it. I did mine prepper style; meaning can-do without the equipment. The result was okay, I guess because I ate everything in 2 meals, tops.

    Tinapa is usually served for breakfast with sliced salted eggs and onions as accompaniment. It's other more commercial use is for Pancit Palabok as topping and flavoring. I have seen featured on tv, factories producing tinapa flakes specifically for this purpose.
Tinapa with salted eggs and onions

        For our dish today, I used small, bony fish called Tamban, but any small fish will do. Should you wish to use milkfish, it is best to debone it first by cutting it open along the length of its back. I will simply upload a video of how this is done because its hard to simply write about it.

         Tinapa by the way is a Tagalog term, tapa being the root word, means 'smoked anything', Tinapa therefore means anything prepared by smoking, though fish will first come to mind. To clear some confusion, Tinapa for the Cebuano-speaking Pinoys mean the canned sardines in tomato sauce. And these same people name the Tinapa, tinap-anan.

Let's make Tinapa! 

INGREDIENTS:

1 pound small to medium sized fish, (do not remove scales!)
salt
2-3 unused teabags, regular or flavored
1 cup uncooked rice
a sprig of rosemary
some orange peel or any fragrant herb

PROCEDURE:
Fish in Brine

1. Clean the fish of entrails, wash thoroughly. Prepare a brine solution of 1:9 salt to water. Example: 1 cup salt to 9 cups water. Immerse cleaned fish for 40 minutes to 1 hour. Drain on a rack.

2. Steam for 35-40 minutes. Cool. Arrange fish on a rack and let drip dry.
Steamed Fish

3. Get a deep wok. Cover with foil paper. Place rice granules in the center, open the teabags and empty contents on top of the rice. Add your rosemary and other herbs you might want to add. Stir with a spoon to thoroughly mix. Place the rack of fish on top. Cover.
rice and tea

4. Turn the heat on medium to medium high and allow the smoke to rise from the combination of dry grains and teabags. Smoke the fish covered for 35-40 minutes or until the fish has turned a lovely smokey brown shade. Turn off heat. Serve the fish hot off the smoker or you may want to keep some for later use. 
Tinapa at Itlog Maalat na Salad for Breakfast

NOTE: If you can find salted eggs, 1 piece will do. In the Philippines, salted eggs are made from duck's eggs and they are tinted purple. Peel the salted egg and slice into wedges and place on a saucer. Slice a piece of red onion and  add to the salted eggs for a perfect accompaniment to smoked fish and rice. Salted eggs is called Itlog Maalat  ( Itlog is egg and maalat means salty )
Itlog Maalat

Hope you liked this post. I just wanted to demonstrate that anything is possible, even without fancy equipment. Besides, when times should call for making things work, moms need to do a MacGyver, huh.


Philippine Independence Day June 12

        June 12 is Philippine Independence Day. The original date was June 12, 1898, so that makes it our 115th.

        As always, all government offices went about celebrating the event with wreath-laying, flag-raising, speeches and the usual courtesy calls by ambassadors from different consular offices.

      Ordinary folks like me, simply attach flaglets on our vehicles and display them for about a week or so. Unlike in the USA where folks yearly pull out all the stops with the red, white and blue themes on decor, food and drinks and even clothing and keepsakes. Filipinos simply remember, and go on with their lives.

       I have had the privilege of visiting the largest mall in Davao City, SM Lanang Premier, earlier during the week and was pleasantly surprised to find an exhibit of Barong Tagalog by Architect Michael Dakudao in celebration of Philippine Barong Tagalog Week. Barong Tagalog is the National Costume for men. For men to wear these, made from natural fibers native to the Philippines like Jusi ( who-see),  Piña ( pineapple fiber ) and Sinamay ( from Abaca fiber ) would be a privilege and an honor, not to mention luxury. These are the kinds or formal wear men don to formal events and official functions and may be worn interchangeably with suits.

       Naturally, I took pictures of the collection, just before the opening ceremonies began. Here they are:
Old Rose and Anito-inspired ( pagan god)


Black Sinamay and beaded with shells

Dark Blue Vintage Piña with floral embroidery by designer Renee Salud in the 1930's

Chinese collared Piña barong with minimalist lace embroidery, my favorite
Closeup of the detail and art deco brass buttons by designer Otoy Mercado

Midnight Blue piña barong with T'boli design

Almost Ombre Rose jusi barong with delicate embroidery

Classic Jusi barong


Almost painted look but these are embroidery

Ostrich embroidered Barong

embroidery detail, nice huh?!
        Simultaneous to this exhibit was the It's More Fun in the Philippines LEGO Exhibit where the makers of LEGO, replicated the Philippine archipelago, highlighting landmarks and iconic symbols. Young and old folks took turns circling the exhibit and taking pictures. Sad thing, I only had my cellphone camera, I couldn't take a panoramic view that would include everything. Here are my few shots.
The LEGO Poster announcement

On the foreground is the iconic Philippine Eagle and the yellow building is the Davao City Hall

Kadayawan Festival, Lego version

Basco Batanes Lighthouse up in the north

San Juanico Bridge at the rightmost, its blurry

Moriones Festival Mask

Paoay church

Vinta ( Muslim inspired ) boats Zamboanga

Zamboanga Peninsula


Thursday, June 13, 2013

Chinese Style Que Kiam ( Kikiam)

        Hi Guys! Sorry I was a bit under the weather, after packing all those 280 kilograms of mangoes in. By early tomorrow morning, we shall be opening 5 baskets of those heavenly Philippine mangoes I can only dream of sharing with you. Already, 3 baskets have been promised to a vendor, we shall be selling the other batches right out the front yard. I wish I could take a video of the queue that we will be expecting. As I mentioned before, the neighbors have known these mangoes since we started harvesting and they look forward to those few days of the year the house becomes a mango stall, right here in the neighborhood.


          I packed the remaining three baskets this morning, even with the sniffles. But they're done and I have gone to a nap to rest. Now, it's time to tend to my readers.


        Today, we will be making one popular street food in the Philippines, Que Kiam or Kikiam. Originally a Chinese recipe, I first tasted this authentic Chinese version when I was in high school and visiting with relatives in Manila. My uncle is pure Chinese, and married to my mom's eldest sister. From what I could recall, he makes Que Kiam, Siomai ,Fishballs and Tofu fresh weekly. He doesn't talk much, but his cooking was awesome!


    Fast forward to this day, practically every street has a row of vendors frying Kikiam, Fishballs, SquidBalls and Tempura, served on rectangular paper plates and swimming in sweet-sour sauce. Even supermarkets carry frozen versions of these, so folks could fry them at home. There are also plenty of commercial versions available on the internet, but the ones seen on the streets have little, if any real fish or squid. To say that these street food have been scaled down is an understatement, but it's the Kikiam that underwent a major overhaul, that the Kikiam known to most, has little if any resemblance to the real appearance or taste of authentic Kikiam.

on the left is the fishball,  kikiam on the foreground, street version

        So get ready for the real thing, because this is one taste adventure, you will want to take again and again. This recipe makes about 5-6 rolls so you can simply freeze the rest for later use. Do not be intimidated with the numerous ingredients, you probably only have to go to the Asian store for the Bean curd wrappers, the rest might already be in your kitchen. A person can consume 1 roll.


Let's Cook:
Chinese Style QueKiam

INGREDIENTS for THE QUE KIAM ROLLS

1 kilogram lean pork, ground
100 g. shrimp meat
1 T. refined salt
4 T. white sugar
2 T. garlic, finely chopped
1/2 c. turnips (singkamas) chopped finely
1/2 c. onions, chopped
1 t. ground black pepper
1/2 tsp. five-spice powder
1-2 eggs, beaten 
1 broth cube
1 package Taupe or bean curd wrapper

FOR THE SAUCE:

1 c. water
6 T. sugar
2 T cornstarch
1 pc. siling labuyo or bird's eye chili,( optional )
1 tsp. salt
1 tsp. soy sauce
1 pc laurel leaf
1/2 tsp. pepper

PROCEDURE:

1. For the QueKiam Rolls, simply mix all ingredients for the rolls except the bean curd wrapper. Before using the wrapper, brush the entire surface with cornstarch dissolved in water. Divide the mixture into 6 mounds or wrap every 250 g. or 1 cup of mixture into a wrapper. Seal ends with the cornstarch-water mixture. Place on a tray seam side down.
heating the oil

2. Freeze the remaining rolls in freezer bags and heat at least an inch of oil on medium heat. Fry the rolls until brown on all sides. These may also be steamed for 25 minutes for a healthier version. Let cool a little before slicing diagonally.
cut them in two so they fit the pan

3. For the sauce, simply throw everything into a pot in medium heat until the sauce comes together think and translucent.
simply browning, these aren't burnt

4. Arrange the sliced rolls on a plate and serve with the sauce or ready made sweet chili sauce. These rolls hold their own as a stand alone dish, as viand, snack, or beer accompaniment.
Que Kiam ready to eat!

NOTE:

The wrappers have a queer soybean smell but it doesn't affect the taste. The wrapper gets crisp with the frying but don't stay that way long enough but the taste remains great. Enjoy!

Wednesday, June 12, 2013

Bola-Bola ( Meat Balls)

Earlier today I made Lumpia Shanghai. Actually, I had a little over a pound of ground pork ( a little over 500 grams) and was wondering how to best utilize the meat for at least two dishes for two different meals. I simply removed a cup for my Shanghai rolls and then reserved the rest for later.

When evening came, I decided to make Bola-Bola ( Bola is Filipino for balls, so the name means; balls, balls) 
Bola-Bola with Sweet Chili Sauce
Yes, almost every country has a meatball version, and I respect that, but this does not mean that our bola-bola is not Filipino in origin. This recipe however, is not very picky  with the meat, any ground pork will do.


I realized early on, that using  purely lean meat does not necessarily produce the best product. A little fat will bring out all the goodness of pork meat.

Let's Cook!

INGREDIENTS:

300 grams ground pork
1-2 T grated carrot
1 small red onion, minced
1/2 tsp ground black pepper
1 1/4 tsp rock salt
1 tsp al purpose seasoning
1 egg
2-3 T flour
1/2 cup bread crumbs


PROCEDURE:

1. Combine first 6 ingredients and mash well with hands until well-combined. Mixture will be a little too wet.

2. Add flour and mix with a spoon until the mixture can hold a shape. Form each heaping tablespoonful into balls about a golfball or bigger. Roll in breadcrumbs.

3. To cook: Fry in deep, hot oil in medium-high heat untti golden brown on one side. Flip on the other side. Drain excess oil in paper towels.

Deep Frying the balls

4. Serve hot or cold with tomato catsup or sweet chili sauce and a cold vegetable salad and rice or bread rolls.

Pinoy Bola-bola

NOTE:
        These Bola-bola are crisp outside and non-greasy. I made 10 big pieces. My sister who happened to be around for dinner was quick to compliment that the Bola-bola I served, was a winner. Yay! How's that for instant feedback?

        Leftovers, if any, may be served with a sweet and sour sauce to make Sweet and Sour Bola-bola. This same recipe can make 20 small balls just for the saucy dish. Frugal but tasty homecooking at its best.