Showing posts with label Cooking. Show all posts

Thursday, July 18, 2013

Chop Suey

        Another exciting event to look forward to during Kadayawan Festival would be the fluvial parade, usually held the Sunday immediately after the Indak-Indak sa Kadalanan  which literally translates to 'dancing in the streets'.
A stylized eagle head float

Durian and Waling-waling depiction
Bahay Kubo Float

Forest Themed Float

Engkantada ( Fairies ) and waterfalls Float

Turtle Float

Waling-Waling Float

Waling-Waling and Durian Float

        Commercial establishments as well as Government entities dress up trucks in Kadayawan themed floats adorning the same with indigenous flowers and compete for top prizes.


        A month long Agribusiness trade fair is also held  where local growers of herbs, vegetables, orchids, ornamentals, landscapers, nursery owners, livestock owners, organic farmers and hobbyists get to display their wares, close business deals and expand their networks. This alone is garden heaven where the well-heeled matrons and tourists brave the open air, sprawling hectares of wares and snag rare orchids and imported ornamentals for a bargain. Expect also to see driftwood furniture and bahay-kubo resthouses to go on sale at these venues.


        Today we're making Chop Suey. Chop Suey is of course as Chinese as Chinese food can get. But Chop Suey has been so integrated into the Filipino culture that it will naturally make an appearance in any special occasion as well as ordinary days at home.

Chop Suey

        Of course, one may choose to go all out for special occasions, some also go for a fully vegetarian Chop Suey, some dress it up and still some dress it down. So you'll probably get a gazillion versions of the same dish anywhere.


        Let's make a modest home version of Chop Suey. Though I'm listing all the ingredients you can add to dress it up.


INGREDIENTS

150 g pork sliced into thin strips
50 g pork liver, sliced into strips ( optional )
50 g. shrimps, peeled (optional )
50 g. squid, sliced (optional)
1 medium head cabbage, sliced into bite-sized pieces
1 medium carrot, sliced
1 medium sayote ( Chayote or Mirliton Pear ), sliced
1 medium chinese pechay, sliced
1 small head broccoli, cut into florets ( optional )
1 small head cauliflower, cut into florets ( optional )
50 g Baguio beans, sliced 
50 g snow peas, tops and bottoms trimmed ( optional )
50 g turnips or singkamas, julienned ( optional )
2 cloves garlic
1 small onion, sliced
1 tomato, sliced
1 T. oil
salt and pepper to taste
1 T. cornstarch dispersed in 2 tsps. water
sesame oil, (optional )


Ingredients


PROCEDURE:

1. Saute garlic, onions and tomatoes in 1 T. oil. Add the pork and cook for about 5 minutes. or until its own juices come out. Add the rest of the meats and or sea foods and simmer until cooked, adding a cup of water.

2. Season with salt and pepper, add the carrots, sliced sayote, Baguio beans and singkamas if using. When half-cooked, add the rest of the veggies.

3. Adjust seasonings. Add the cornstarch mixture and cook until the sauce thickens. Remove from heat, drizzle some sesame oil and serve immediately.
Chop Suey

NOTE: You might be looking at my Chop Suey and not find the other ingredients listed, I did say I was making the dressed down, modest home version before listing the ingredients. No worries, the taste is the same, well, almost!

If you are unfamiliar with Chayote or Mirliton Pear, below is a picture of the tasteless, watery vegetable, that's quite filling and neutral and so, a complimentary foil to the crunch of the other vegetables.
Chayote or Mirliton Pear

I must also teach you that there is a technique in handling these. Before peeling the vegetable, cut-off at least an inch off the narrow end and, rub against the cut side in a circular motion until a whitish foam develops. Do this until no more foam develops, wash, peel, halve and remove the seeds before slicing. Why? because if you omit this important step, the vegetable gives off a slimy, clingy film that sticks like glue to your skin and will take days before it comes off. Aside from the discolor, the affected skin wrinkles and dries up, pretty much what would happen if rugby cement was left on skin.


Saturday, June 15, 2013

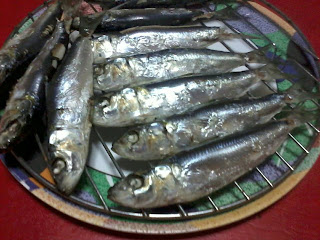
Homemade Tinapa ( Smoked Fish without a Smoker )

        Tinapa is Smoked Fish of any variety. Usually sold in public markets are varieties of small fish, sardines, milkfish and round scad. I can almost guarantee that most of my countrymen are not aware that an appliance such as a smoker exists. Not because we might have no use for them but because there is no demand, so manufacturers don't sell any of them here in my country. Besides, smoked fish can be bought for cheap and is readily available all over the country.

     Last April, I searched the local classifieds for smoking machines or home smokers and found industrial sized appliances. After which, I scoured the internet for smoking recipes. There were tons with video instructions using a smoker and a grill but I searched for a tutorial on home smoking without the equipment. And luckily, I found one! The reason I knew something like this was out there was, I read my mom's vintage recipe book which simply asked for teabags and rice. 

        If you have a smoker at home, by all means use it. I did mine prepper style; meaning can-do without the equipment. The result was okay, I guess because I ate everything in 2 meals, tops.

    Tinapa is usually served for breakfast with sliced salted eggs and onions as accompaniment. It's other more commercial use is for Pancit Palabok as topping and flavoring. I have seen featured on tv, factories producing tinapa flakes specifically for this purpose.
Tinapa with salted eggs and onions

        For our dish today, I used small, bony fish called Tamban, but any small fish will do. Should you wish to use milkfish, it is best to debone it first by cutting it open along the length of its back. I will simply upload a video of how this is done because its hard to simply write about it.

         Tinapa by the way is a Tagalog term, tapa being the root word, means 'smoked anything', Tinapa therefore means anything prepared by smoking, though fish will first come to mind. To clear some confusion, Tinapa for the Cebuano-speaking Pinoys mean the canned sardines in tomato sauce. And these same people name the Tinapa, tinap-anan.

Let's make Tinapa! 

INGREDIENTS:

1 pound small to medium sized fish, (do not remove scales!)
salt
2-3 unused teabags, regular or flavored
1 cup uncooked rice
a sprig of rosemary
some orange peel or any fragrant herb

PROCEDURE:
Fish in Brine

1. Clean the fish of entrails, wash thoroughly. Prepare a brine solution of 1:9 salt to water. Example: 1 cup salt to 9 cups water. Immerse cleaned fish for 40 minutes to 1 hour. Drain on a rack.

2. Steam for 35-40 minutes. Cool. Arrange fish on a rack and let drip dry.
Steamed Fish

3. Get a deep wok. Cover with foil paper. Place rice granules in the center, open the teabags and empty contents on top of the rice. Add your rosemary and other herbs you might want to add. Stir with a spoon to thoroughly mix. Place the rack of fish on top. Cover.
rice and tea

4. Turn the heat on medium to medium high and allow the smoke to rise from the combination of dry grains and teabags. Smoke the fish covered for 35-40 minutes or until the fish has turned a lovely smokey brown shade. Turn off heat. Serve the fish hot off the smoker or you may want to keep some for later use. 
Tinapa at Itlog Maalat na Salad for Breakfast

NOTE: If you can find salted eggs, 1 piece will do. In the Philippines, salted eggs are made from duck's eggs and they are tinted purple. Peel the salted egg and slice into wedges and place on a saucer. Slice a piece of red onion and  add to the salted eggs for a perfect accompaniment to smoked fish and rice. Salted eggs is called Itlog Maalat  ( Itlog is egg and maalat means salty )
Itlog Maalat

Hope you liked this post. I just wanted to demonstrate that anything is possible, even without fancy equipment. Besides, when times should call for making things work, moms need to do a MacGyver, huh.


Thursday, June 13, 2013

Chinese Style Que Kiam ( Kikiam)

        Hi Guys! Sorry I was a bit under the weather, after packing all those 280 kilograms of mangoes in. By early tomorrow morning, we shall be opening 5 baskets of those heavenly Philippine mangoes I can only dream of sharing with you. Already, 3 baskets have been promised to a vendor, we shall be selling the other batches right out the front yard. I wish I could take a video of the queue that we will be expecting. As I mentioned before, the neighbors have known these mangoes since we started harvesting and they look forward to those few days of the year the house becomes a mango stall, right here in the neighborhood.


          I packed the remaining three baskets this morning, even with the sniffles. But they're done and I have gone to a nap to rest. Now, it's time to tend to my readers.


        Today, we will be making one popular street food in the Philippines, Que Kiam or Kikiam. Originally a Chinese recipe, I first tasted this authentic Chinese version when I was in high school and visiting with relatives in Manila. My uncle is pure Chinese, and married to my mom's eldest sister. From what I could recall, he makes Que Kiam, Siomai ,Fishballs and Tofu fresh weekly. He doesn't talk much, but his cooking was awesome!


    Fast forward to this day, practically every street has a row of vendors frying Kikiam, Fishballs, SquidBalls and Tempura, served on rectangular paper plates and swimming in sweet-sour sauce. Even supermarkets carry frozen versions of these, so folks could fry them at home. There are also plenty of commercial versions available on the internet, but the ones seen on the streets have little, if any real fish or squid. To say that these street food have been scaled down is an understatement, but it's the Kikiam that underwent a major overhaul, that the Kikiam known to most, has little if any resemblance to the real appearance or taste of authentic Kikiam.

on the left is the fishball,  kikiam on the foreground, street version

        So get ready for the real thing, because this is one taste adventure, you will want to take again and again. This recipe makes about 5-6 rolls so you can simply freeze the rest for later use. Do not be intimidated with the numerous ingredients, you probably only have to go to the Asian store for the Bean curd wrappers, the rest might already be in your kitchen. A person can consume 1 roll.


Let's Cook:
Chinese Style QueKiam

INGREDIENTS for THE QUE KIAM ROLLS

1 kilogram lean pork, ground
100 g. shrimp meat
1 T. refined salt
4 T. white sugar
2 T. garlic, finely chopped
1/2 c. turnips (singkamas) chopped finely
1/2 c. onions, chopped
1 t. ground black pepper
1/2 tsp. five-spice powder
1-2 eggs, beaten 
1 broth cube
1 package Taupe or bean curd wrapper

FOR THE SAUCE:

1 c. water
6 T. sugar
2 T cornstarch
1 pc. siling labuyo or bird's eye chili,( optional )
1 tsp. salt
1 tsp. soy sauce
1 pc laurel leaf
1/2 tsp. pepper

PROCEDURE:

1. For the QueKiam Rolls, simply mix all ingredients for the rolls except the bean curd wrapper. Before using the wrapper, brush the entire surface with cornstarch dissolved in water. Divide the mixture into 6 mounds or wrap every 250 g. or 1 cup of mixture into a wrapper. Seal ends with the cornstarch-water mixture. Place on a tray seam side down.
heating the oil

2. Freeze the remaining rolls in freezer bags and heat at least an inch of oil on medium heat. Fry the rolls until brown on all sides. These may also be steamed for 25 minutes for a healthier version. Let cool a little before slicing diagonally.
cut them in two so they fit the pan

3. For the sauce, simply throw everything into a pot in medium heat until the sauce comes together think and translucent.
simply browning, these aren't burnt

4. Arrange the sliced rolls on a plate and serve with the sauce or ready made sweet chili sauce. These rolls hold their own as a stand alone dish, as viand, snack, or beer accompaniment.
Que Kiam ready to eat!

NOTE:

The wrappers have a queer soybean smell but it doesn't affect the taste. The wrapper gets crisp with the frying but don't stay that way long enough but the taste remains great. Enjoy!

Wednesday, June 5, 2013

Easy Chicken Curry


        Curries originated from India, no argument here. Though most Filipinos are hardly aware that there is a red curry apart from the yellow one. 

        I too, was disappointed, when back in my high school years I stumbled onto Time Life Magazine's library of Cuisines from Around the World. An entire volume was devoted to Indian cooking, and there it was, Murg Kari. Well, like most, I haven't tasted authentic Indian cooking yet, though I definitely would like to try their Tandoori Chicken and roti parathas

        I imagined that if any international dish ever found its way into a Filipino kitchen, it will somehow undergo Filipinizing. You see, most common households do not put salt and pepper shakers on the table. All seasoning is done on the stove top, except for Mami and Pansit Palabok, where it is customary to serve with ground black pepper, soy sauce and fish sauce.  Only dipping sauces are served on the table, namely soy sauce, ketchup or spiced vinegars. A dish is frowned upon when it is found wanting. Expect the cook to take the entire contents of the platter back to the stove and correct the seasonings, while the family members patiently wait for the improved version of the dish, and then everyone can eat.


         I was actually toying with the idea of encouraging fellow Filipino nutritionists to look into the plausibility of promoting Filipino food internationally for a skinny diet. You see, The Filipino diet may look carbohydrate-laden, what with all the rice, bread, potatoes and rice cakes. But obesity among our race is traceable to consumption of western fast food staples, and not our eastern diet. It's a long shot, but worth looking into, don't you think?

         Anyway we're making Chicken Curry Pinoy Style today. I was surprised to find my children requesting these for school lunches since last year. It's easy to put together and you can make it as spicy as you want. You may easily swap the same amount of pork or tuna fish anytime for variations. ( Pinoy is slang for Filipino )
Chicken Curry

Let's cook.

INGREDIENTS:
Curry ingredients

1 whole chicken breast, chopped into serving pieces ( around 2 cups )
1 large potato, cut into wedges
1 small onion, sliced
1 clove garlic, minced
1 thumb-sized ginger, sliced
1 red and 1 green bell pepper, seeded and sliced
1-3 T. green or yellow curry powder
1-2 T. Buco Coconut Cream powder or 1 cup coconut milk ( gata)
salt and pepper to taste

PROCEDURE:

1. Heat a teaspoon of oil in a pot. Place garlic, onions and ginger and cook until fragrant and toasty. 

2. Add chicken pieces and salt generously ( about a teaspoon or so of coarse salt), so the meats absorb the ginger flavor and won't taste bland against the sauce. Toss until the meats have turned white. Cover and let simmer in its own juices until it browns on its sides.
browning the chicken

3. Add 1 cup water or coconut milk, and potatoes. Cover and cook until potatoes are almost tender.

4. Add the carrots, curry powder and seasonings. If using water or chicken stock, add the Buco Coconut Cream powder at this point and bell peppers. Let boil.

5. Adjust the seasonings, adding more curry powder if you prefer it spicier. Add more coconut milk, if you want it milkier, with just a hint of curry for the elderly and toddlers. Always, taste as you go.

6. Serve hot as a stand alone viand with steamed rice.
Chicken Curry

NOTE: Curry packs a punch as a viand, and stands out among the dishes that Filipinos find on their restaurant menus as the only one having that distinct color, and spicy, but everyday appeal.

If you noticed, I have recommended at least three Filipino dishes as being ideal food for elderly people and toddlers. This is because we don't make separate baby food from the family's regular dishes.

I'm a firm believer of allowing babies to experience as wide a variety of textures and tastes as well as not shortchanging the elderly of exciting flavors just because they are older.

As a result, I have kids who eat whatever I set on the table. ( What mom would not want that?) and elderly parents who cannot complain. Bland food is not for Pinoys, young or old, better believe it!

Tuesday, May 28, 2013

Homemade Chocolate Syrup

Today was a really busy day. I went out to finish shopping for my 5th grader's school needs. I'm just so glad I was able to get really good buys, really fast. I'm no big fan of last-minute shopping as that usually translates to overspending. Turns out, the week before classes begins is still not last-minute as I encountered no long queues.

Classes begin for majority of Philippine schools on Monday, June 3rd. This weekend, I will be making large batches of my breakfast and lunch meals to grab and go. 

While most busy moms will be stocking up on store-bought hotdogs, breakfast sausages, tvp burgers, tocinos ( marinated meats ), chicken nuggets, cereals and artificial juices in tetrapacks, yours truly will be making fruited yogurt drinks and fruit concentrates for the kids to go.

It may sound daunting, but a little preparation and menu planning goes a long way. Since most kids love to eat favorite meals interchangeably for breakfast and lunch, making extra portions for freezing and later reheating will go a long way.

I just got off the phone with a mother of 3 small kids. Her concern is all too real, since her kids' have very different needs and food preferences; she has to prepare three different menus for every meal, every single day. This is one of those times, I'm thankful my kids like the same things.

This is where my previous posts come in handy: ziplock bags of homemade pancake mixes, skinless longganizas, chicken nuggets, spanish sardines, tuna flakes in oil, daing na isda ( marinated fish ), boneless bangus ( milkfish ) belly, lumpia shanghai (pork spring rolls), porkchops  and chicken fillet come in handy. These, I pretty much covered already in my posts.

For the pre-cooked meals; chicken and pork adobo, bistek tagalog ( beefsteak Filipino style), beef teriyaki, Korean beef, tonkatsu ( breaded Japanese porkchop), katsudon ( Japanese pork topping) and gyudon ( Japanese beef rice topping ) are my children's list-toppers. These, I haven't yet but encourage parent's to try.

It should not come as a surprise that each one of the above choices are paired with rice. We're Asian after all.

Today will be about homemade chocolate syrup. It's so easy to put together and is so versatile.  I'm sure moms will be grateful to have it on hand in the kitchen. Kid's of all ages will love this! 


We use this as syrup for pancakes, topping for ice cream, frosting, or desserts, flavoring for oatmeal, yogurt, also as a spread. If we ever run out of MyChoco, they squirt this on to a glass of milk for instant chocolate milk drink. Neat, right?


INGREDIENTS:

3/4 c. Hershey's or any premium brand of Dutch processed (alkaline) cocoa powder
1 to 1 1/2 cup white sugar
1 c. water
1 T butter ( optional)
1 tsp. vanilla
1 tsp. salt

PROCEDURE:

1. In a pot, combine cocoa powder, white sugar, salt and water. Turn heat on medium high.

2. Once it boils, and while stirring with a whisk, boil for 1 minute and not any longer. Remove from heat. Cool a little, and add vanilla and butter. Syrup will thicken as it cools.

3. Cool completely and transfer to a squeezeable plastic bottle dispenser or reuse a pancake syrup bottle. How easy is that?

NOTE: Use only the best cocoa powder for excellent, smooth and creamy results. Anything less will result into a grainy product.

A big plastic bottle of Hershey's or any other brand of chocolate syrup costs about PhP150 ( US $ 4. Double this recipe is only about P70 ( US $1.50 )and lasts 2-4 weeks depending on usage. Big savings again!

Thanks once more for visiting, and please leave a comment on what you would like me to post next. I hope you found this post helpful.


Sunday, May 26, 2013

Homemade Tuna Flakes in Oil

          
          One canned food that always made it to my shopping cart on a weekly basis, is tuna flakes in oil.  Its a versatile ingredient for sandwiches, omelettes, pasta, salads and whenever we want a change of pace from meats.

          The children will happily substitute canned tuna for recipes calling for meat. And for a very long while, I too felt it was healthier, considering that tuna is an excellent source of Omega 3 which is good cholesterol. I was serving these several times per week, until I found USFDA and Oceana reports of tuna canners mislabeling and using cheaper and more readily available fish, other than tuna. This includes, among others; dolphins, halibut, snapper, salmon, cod, sole and grouper. If that was not enough,  related reports also reveal dangerous levels of Mercury in canned tuna products in certain areas. If you want to read the entire article and its supporting studies, read the report here.

          Instead of acting defeated, and banning canned tuna from the dinner table altogether, I simply scoured the internet for a recipe for making healthy homemade canned tuna. This should be good, because I can make sure my family is getting the REAL thing plus, I can get the freshest catch and make more, for a fraction of the cost.

          So, go to the market and seek out the freshest tuna with the brightest of eyes, reddest of gills and firmest of flesh and have the vendor slice you a juicy piece so you can make a good 3 weeks supply of healthy tuna.

INGREDIENTS:

500 g. fresh tuna, dark meat removed
2 cloves crushed garlic
1 pc. bay leaf
1 T. sliced ginger or lemon zest
1 tsp. peppercorns
1 tsp. salt
Extra Virgin Olive Oil to cover

PROCEDURE:

1. Wash tuna well, pat dry with paper towel. Slice into pieces 1/4 inch thick.

2. Arrange in a pot and add the remaining ingredients. Pour enough EVOO to cover.

3. Turn on the heat to low, and slowly bring to a bubbly froth ( not really a boil, and definitely not deep frying!). for a good 10 minutes.

4. Remove from heat and allow to cool to room temperature. Oil and broth will have separated.

5. Carefully transfer chunks to prepared, sterilized bottles and add the oil and broth, leaving out the spices. If you desire to have flakes, transfer the chunks to a plate, and carefully flake with two forks. Spoon it back in the bottles.

NOTE: The ginger or lemon zest removes the fishy smell. The tuna may be eaten straight from the bottle. Keep the rest in the refrigerator.  It is lightly salted so that additional spices and or seasonings may be added to it for other recipes. Yield: 750 g or the equivalent content of 6 small cans.

Tuna flakes in oil is my kids' favorite for Carbonara and omelette, it's a lot healthier and packed with body-building protein unlike the unhealthy, heart clogging fat from bacon. And because it's homemade, I can have the peace of mind that my family is not chomping on some trusting, friendly but unfortunate dolphin. 

Do take the time to read the report by Oceana and the USFDA. I find useful information and no-holds-barred health news from naturalnews.com on an almost daily basis. 

Do it yourself cooking always outweighs the convenience of ready to eat grocery food by a wide mile. Working moms should find this recipe so easy to put together, and they will be thanking themselves to have something to pull out of the fridge, on the laziest of days.

I'm still trying to break the code for Corned Tuna, the latest canned tuna game changer. When I do, I will be making quadruple the recipe all at once, and you will, of course learn how to make them too.

Happy Sunday everyone!
<br>

Thursday, May 23, 2013

Homemade Ice Cream Cake

         
Ice Cream Cake
 

               March 2nd was my husband's 48 birthday, and being a DIYer, I wanted to make him a birthday cake from scratch. But I wanted it to be different so, I thought, why not go all the way different, and combine two birthday favorites; ice cream and cake in one?

           I bake only on special occasions because experience taught me that eating baked goods will result in much weight gain. So, when I do, I go all-out. Because after all, life is meant to be enjoyed, not endured, right? Besides, it will be a good two and  half months before the next cake-making, so plenty of time to lose the excess calories.


          And so, I went online to find the right Chocolate cake recipe, and I found Hershey's website. When I found the one recipe I liked, it was exactly my all-time favorite moist chocolate cake recipe cut out from a 1980's women's magazine by, guess who? Hershey's. It's my secret weapon, really,  whenever a special chocolate recipe is needed. I've made it so many times over the last 20 years, it's still my trusty old moist chocolate cake.


Hershey's Moist Chocolate Cake Recipe

Ingredients:

2 c sugar
3/4 cup Hershey's cocoa powder
2 eggs
1/2 c oil
1 3/4 c All purpose Flour
1 12 tsp baking powder
1 tsp salt
1 cup milk
2 tsp vanilla
1 cup hot water

Procedure:
1. Sift together dry ingredients, mix well. Add eggs, oil. vanilla and milk. Add boiling water and stir. Mixture will be runny. Pour into a round pan lined with foil or sprayed with a nonstick spray and pop into oven 35-40 minutes 375F. Cool completely, and  slice into two rounds.

To assemble ICE CREAM CAKE you will need:
Ice Cream cake ingredients


1 tub chocolate ice cream, any brand, softened,divided
1 small package tiny marshmallows, divided
1 bar white chocolate, 150 g. any brand
1 bar dark chocolate, 150 g. any brand
 moist chocolate cake, cut into two parts

Directions:


1. Line a spring form pan or ordinary cake pan with foil or cling film, leaving enough lengths with which to pull the ice cream cake out.


2. Place 1st layer of cake and spread 1/2 of the softened ice cream, making sure ice cream gets to the sides, sprinkle with marshmallows. Pop in freezer until almost solid.


3. Carefully place the other cake layer on top and spread remaining ice cream, making sure to spread to the edges. Sprinkle with the remaining marshmallows. And freeze again.


4. Break dark chocolate into pieces and place inside a saucepan set on top of a pot with boiling water over a stove. Stir with dry spoon until melted and smooth. ( Do not let any liquid get into the melted chocolate or it will seize.


5. Spoon or drizzle over hot melted chocolate over the cake. Melt the white chocolate using the same procedure, but making sure the saucepan is washed, and wiped clean and dry. Drizzle over cake. Freeze once more.


6. Using the overlapping edges of the cling film or foil, lift the entire ice cream cake out of the pan. ( unless you were using a spring form pan )


7. Place on a tray and serve sliced on individual plates with whipped cream or as is.


Note: If pressed for time, simply buy your favorite sponge cake, slice into halves and proceed as directed. You may also add crushed nuts and or Oreo cookie pieces for more oomph.

I hope you enjoyed this post as much as I did. I posted the pictures on my Facebook page in March, and friends liked it a lot. I also promised to someday give a tutorial, so today is that day.