Sunday, June 30, 2013

Special Puto ( Rice Cakes )

        Great day to y'all ! I haven't been posting my recipes of late as I was ' forced ' to DIY my college student's uniforms as all the tailors and dressmakers in the area have begged off. I'm thinking of posting that project under DIY but then, the pants materials is dark colored, I'm not sure if my camera can do justice to my project.

         I have finished one pair of pants last night, and will be working on the second one today, hopefully finish it, and then work on my daughter's skirts. Good thing the sewing guru in Youtube is very helpful with his tutorials. I wouldn't know what to do if it weren't for his tutorials.

        Today, we're making Puto or Rice Cakes. 10  or 15 years ago, special tiny colored puto cheese came out in the market and it was an instant hit. Every single colorful morsel was just the right bite-size, and so people started consuming trays upon trays of Puto Cheese.

        The great thing about this recipe is that, it is the exact recipe for Puto Cheese. To change it up a bit, one may use sliced Red Eggs on top in lieu of cheese. I did not put cheese on top of these so I'm not calling these Puto Cheese this time.
Special Puto

        Puto is a lightweight, fluffy, steamed rice cake made from flour and coconut milk. For ease of preparation, milk may be used without affecting the taste. Puto  always appears on our KAKANIN spreads alongside KUTCHINTA.

        When we say KAKANIN;  that almost means a dessert table, but then again showcasing only native delicacies, which doubles as breakfast and snack fare. Unlike desserts which normally is eaten after a full meal, KAKANINs hold their own, and are offered even in Hotels and restaurants and tourists, as a taste of Philippine Culture on a plate. On some occasions, festivals are held and KAKANIN's take centerstage. I remember attending a sunrise wedding some 20 years ago where the couple served different varieties of KAKANIN along with Kapeng Barako  ( Strong, native coffee ) and Native Hot Chocolate or SIKWATE.

        It's Summer in the West, so why not make some to take to pool and beach parties or make some for the kid's snacks? I promise that one bite won't be enough, and you will find yourself making these again and again.

Let's make Puto!

INGREDIENTS:

2 cups All Purpose Flour
4 tsps. baking powder
1 cup sugar, white
2 cups coconut milk or fresh milk
slices of cheese or salted eggs ( optional )

PROCEDURE:

1. Grease the smallest muffin tins you can find. Or plastic or metal Puto molds, if you have them. Set aside. 

2. Blend together the first four ingredients. Divide into four bowls and tint with different pastel food colors. Pour into molds, almost to the top.
Tinting with pastel colors

and placing them in molds

3. This is optional : put a sliver of cheese on top of each for puto cheese. Or 2 thin slices of red eggs for exotic taste. Plain is perfectly acceptable.
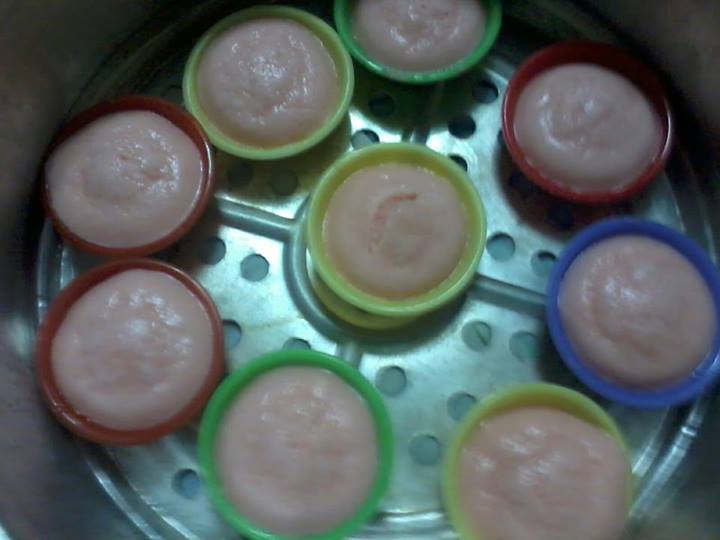
Steaming them halfway 

4. Steam covered for 15-20 minutes. Slide off the molds and arrange on a plate and serve.


NOTE: If you can find the 1 inch puto molds, those are perfect for making hundreds of pastel colored puto for children's parties and other events. They look pretty and are equally tasty treats. These are healthier versions than muffins or cupcakes. I'm sure the elderly and the very young kids will enjoy this as well. 

I have given the variations above, for Puto Cheese and Puto with Red Eggs. These are Google pics of those:
Commercially available Puto Cheese

Brightly colored Puto Cheese

Puto with Red Eggs closeup

Puto with Red eggs
Once more, thanks for visiting and do let me know if you have made these.  My readers usually leave their comments on Facebook. I think they're as shy as I am. But your feedback gives me encouragement, so thank you, again!

Wednesday, June 26, 2013

Beef Caldereta

        Special occasions call for special occasion food. In the Philippines, we sometimes refer to special occasion dishes as Fiesta Fare. Fiesta is a Spanish word which means festival. And of course, after 300 years of Spanish occupation, a lot of our dishes took on Spanish influences.


        There are as many versions of Beef Caldereta as there are regions in the country. Some like it hot, so they add hot peppers. Purists use only the annato seeds or fresh tomato puree to give it its characteristic color. Still some have added olives and cheese to the recipe. But this is one dish easily recognizable on any table spread as it commands a place of importance and avid patronage being one of the more expensive dishes on the Filipino table. Though, an acceptable alternative to use is goat meat, but with additional preparation steps to get rid of the fishy goat smell. (I.e. washing and or boiling raw goat meat in vinegar, or including 7-Up or Sprite in the ingredients or both.

Cheesy Beef Caldereta

        The Beef Caldereta I made was one a friend taught me 10 years ago. I attended one occasion in her home and she served Beef Caldereta, among others. So before leaving, I begged her to give me her recipe for Beef Caldereta. Soon enough, when I had the chance, I tried the recipe, and it was awesome!


        So, if you're wanting to impress guests coming over for dinner, try making them a classic Filipino 'wow' dish like this one.


INGREDIENTS:

1 kg. lean beef meat, sliced into 1 inch chunks
1 225 g. bar cheese, sliced into cubes
1 1/2 cup potatoes, cut into chunks
1 cup carrot chunks
1/2 cup green peas
1 cup tomato paste
1 laurel leaf
1 cup pineapple chunks
3 cloves garlic, minced
1 whole red onion, quartered
1 red and green bell pepper, sliced
salt and pepper to taste
Caldereta veggies

PROCEDURE:

1. Place beef in enough water to cover and pressure cook for about 35 minutes or boil until tender. ( Remove scum that forms in the early stages of boiling.) Add water as necessary.

2. In a little oil, brown the potatoes, set aside. Brown the garlic and add onions. Wait until onions turn transparent then add the beef and stock. Add the laurel leaf, potatoes and carrots and cook until the vegetables are almost tender.
browned potatoes

3. Add the tomato paste and pineapple chunks. Season with pepper and stir in cheese cubes. Add red and green bell peppers, pineapple chunks and green peas. Adjust seasonings. Adding salt only if the cheese has not given you the right cheesy, creamy sauce.

Serve hot or on a chaffing dish along with other special dishes. Freeze leftovers in freezer bags.
Cheesy Beef Caldereta closeup

Tuesday, June 25, 2013

Max's Fried Chicken

        I was so preoccupied with guests coming over today that I wasn't able to post about my Molo Soup. Today, June 25th, happened to be my eldest daughter's 18th birthday. 

        In May of this year, Erika came to me saying she doesn't really need to have a big party for her 18th birthday. Surprised, I asked what's going on, and she said sheepishly that she still felt immature, that a coming-of-age-party will only force her to be someone she is not ready to become yet. And then she says, " can we have it next year, na lang? So I asked her, "you mean you're going to make 19 the new 18? "Pretty much!"was the quick answer. And so that settled the issue.

        Mother and daughter decided we were going to plan for that belated coming out party. She was to take her skin and hair to the next level, and I was going to make sure her teeth will be all ready for the event next year. ( Those three aspects need work)

        But still her friends from college will want to come over and raid the kitchen, so I  asked who was coming, and how many they were. I opted not to post a new recipe last night and planned for tonight's dinner instead.

        I decided on Beef Caldereta, Max's Fried Chicken, Bam-I, and Lumpia Shanghai with rice for the meal and Buko Pandan for the drinks and Maja Blanca for dessert.

        I first tried making Max's Fried Chicken for Christmas dinner last year. Because the kids and my two nephews are Fried Chicken lovers, there must always be the likeness of fried chicken at any special occasion. 
my Max's Fried Chicken

        I like this recipe because it's so simple to make and delivers great results every time. The chicken is always licked to the bone, and there are no leftovers. 

        Max's Restaurant is an iconic landmark in the Philippine Foodscape. Beginning in 1945, after World War 11 when Maximo Gimenez, a Stanford -educated Filipino teacher was befriended by American soldiers.

        The soldiers went over to his house often for a drink or two. Soon after, they started paying for their drinks and the chicken and steak being served to them. Maximo opened his cafe, and not too long after, the Filipino public came to know about the tender, juicy and tasty chicken, hence Max's Restaurant was born.

        With branches all over the country and abroad, Max's Fried Chicken has won over fans from all over.

        As I searched the internet for international branches; I found ones in California, Canada, Hawaii, Nevada and New Jersey in the US and United Arab Emirates in the Middle East. Luckily, we can now recreate the greaseless, crispy, juicy taste right at home.

INGREDIENTS:
3 simple ingredients

1 Spring chicken
1/4 cup  chopped cilantro or parsley ( kinchay)
6 pcs bay leaves
4 cups water
2 tsp salt
1 tsp ground black pepper
oil for deep frying
1 or 2 camote (sweet potatoes), peeled and sliced into wedges

PROCEDURE:

1. Boil 4 cups water in a steamer, add the cilantro and bay leaves. Place cleaned whole chicken on steamer plate and steam 45 minutes.
After steaming

2. Remove from steamer and let cool and allow to drip on a rack placed over a plate.

3. Mix salt and pepper in a small bowl and rub all over, inside and outside the steamed chicken.

4. Heat oi until hot enough. Deep fry 12 minutes until golden brown. Remove from heat and drain excess oil. Fry camote wedges, Drain excess oil with paper towels.
one side done

browning some more

5. Plate the whole fried chicken with the camote fries and banana catsup for a truly authentic Max's experience.
yum, yum, yum!

tasty, juicy and crispy and greaseless!


NOTE: The only way to eat this of course, is with your hands, and with rice. Authentic Filipino Fried Chicken recipe born after the war and loved by many. I hope you try this one. This is a sure winner!

I served the Max's Fried Chicken with Lumpia Shanghai cut into 4's for  crisper results. And I made two because obviously one would not be enough.  

Am able to post now as the guests have left, no more Caldereta or Max's Fried Chicken. Told you, no leftovers! Much love...and thanks for visiting.

Sunday, June 23, 2013

Siomai ( Steamed Pork Dumplings)

Google pic of dimsum Siomai

        Today we will be making the Chinese dimsum Siomai ( Pork and Shrimp dumpling ). Before the  year 2000, Siomai was strictly served in Chinese dimsum restaurants. But something happened to the streetfood scene when people had had enough of fishballs and squidballs. They began to look for more filling snacks that had substance, and so Siomai entered the picture. Nowadays, Siomai is everywhere, from peddlers to street vendors; everyone has a version. Some even have yellow wrappers. Some put green peas or carrots or raisins or green onions on top.
Google pic of yellow wrap siomai


        It is the latter fact that I had to find a real food version of Siomai. My children totally dig the Siomai, but I am quite aware that the severely stuffed version may be made of other stuff I might not like very much. First, there is the concern of solid chunks of fat, then there's the extenders and food additives and finally, there's the issue of food handlers. Disease can creep into my unsuspecting family members through any of these loopholes.


        So, I dug up my trusty, old National Rice Cooker's 1970's recipe of Siomai, found that it was to my liking and so I am sharing these with you now to make for your families, too.


        Siomai is traditionally made with shrimp and pork meat. The shrimp slicess add depth of character to the siomai, and a sweetish, exotic taste that makes all three pieces, not quite enough. Other versions have been made like beef siomai, chicken siomai, shark's fin siomai, and Japanese siomai with nori wrap. Some enterprising small-scale tuna producers even came up with tuna siomai, but nothing beats the pork and shrimp siomai. There is something about that succulent, juicy taste of real, organic ground pork and fresh from the ocean, chunky shrimp combination that hits the spot!

        So, let's make healthy Siomai! This recipe can make about 30 pieces, enough for 5-8 people.

INGREDIENTS:
Siomai ingredients

1 c. chopped shrimps
1/4 c. ground pork
1 cup singkamas, ( turnip, grated)
1/4 c spring onions, chopped
1 pc. egg
1/8 tsp ground black pepper
1/2 tsp all purpose seasoning
1 tsp salt
1 pkg. siomai or wonton wrapper, the round ones will look infinitely better!
sesame oil
calamansi and soy sauce

DIRECTIONS:

1. Combine first 8 ingredients. Wrap about 1 teaspoon of mixture in a siomai or wonton wrapper. Shape into a bonnet like pouch.
the mixture


place a teaspoonful of the mixture in the center

wet the edges with water and gather up the sides

Press down to make a wide base and flatten the top portion

Arrange on top of steamer plate and brush with sesame oil

After steaming for 20 minutes

2. arrange on a steamer plate brushed with vegetable oil then brush with sesame oil. Steam for 20 minutes. Serve with soy sauce and kalamansi slices.
Shrimp and Pork Siomai

Individual serving
NOTE: Some recipes dictate that a tiny piece of carrot or raisin be put on top of each siomai, that's optional. I tried eating siomai with those two, and didn't find it to my liking, I think the combination is already perfect as is.

To serve: squeeze a slice of kalamansi or two over the siomai pieces, and drizzle soy sauce. With a fork, toothpick or chopsticks, take your most awaited homemade dimsum bite. 

There's a growing popularity for the chili paste used along with the kalamansi and soy sauce. I will post that recipe too, after the Molo Soup. 

Have a great day, everyone!

Saturday, June 22, 2013

Atchara or Pickled Papaya ( Green Papaya Relish)

        Hey Guys! I went to Bansalan yesterday, its some 70 something kilometers, and two hours away from Davao City to attend the wake of my husband's uncle. I saw and took pictures of a week-old calf and was able to bring home two freshly picked pineapples and two green papayas for Papaya Pickle or Atcharang Papaya. We also took some 6 pineapple crowns for planting tomorrow morning.
Atchara

        Atchara or Papaya Pickle is a ubiquitous Filipino salad and side dish, served usually with Tapsilog and Barbeque dishes. It nicely rounds up all salty and fatty dishes with its sweet-sour taste. Try making some for your next barbeque, you will most definitely be reaching for it every occasion you get . Though technically a pickle, this is not used like your cucumber pickle as ingredients for relishes or sandwiches, but served alongside rice and main dishes that are either fried or grilled.

        This relish appears from breakfast, all the way to dinner. From the sidewalk eateries to the classiest of restaurants, Atchara will remain to be the most popular of Filipino relishes.

INGREDIENTS:

Atchara ingredients

Green unripe papaya

Grated papaya

4 c. grated unripe papaya
1 carrot, sliced thinly
1 red bell pepper
2 red onions, sliced
3 T. salt
1 thumb-sized ginger, sliced
2 c vinegar ( Apple Cider or white coconut vinegar )
1 1/2 c. white sugar
2 tsp. salt


PROCEDURE:

1. Sprinkle 3 T salt on grated papaya, knead to extract the bitterness from the papain juices. Let stand 30 minutes to dehydrate the papaya.
the whole batch reacting with salt

2. Squeeze the juices from papaya, and discard. Rinse over a strainer under running water, kneading some more. Squeeze all the liquid from the papaya. Alternately, get a piece of cheesecloth and squeeze every cupful to remove the last traces of liquid. Or, you may also use the laundry spinner which does a mighty great job, too.
squeezed

3. In a pot, boil vinegar, sugar and 2 tsp salt until sugar is fully dissolved. Add the vegetables and let boil a little to cook vegetables. Turn off heat and remove from fire.

4. While still hot, arrange the atchara inside sterilized bottles. Seal and cool completely and store in the refrigerator. Some folks cure the atchara for 3 days to a week to develop its taste. Atchara that is at least 3 days old in the fridge tastes best. I made four bottles.
bottled atchara
a small serving

Serving suggestions:
Grilled chops with java rice, dipping sauce and atchara


Crispy pata and atchara, pinakurat and soy sauce

Lechon Kawali, lechon sauce and atchara

Chicken barbecue and Atchara

Grilled chops, java rice, Atchara

Pork Barbecue, java rice and Atchara


AND, just before I forget, the pictures of the week-old calf  with its mother and m
y take home pineapples.
calf and mom on a Bansalan farm

Wednesday, June 19, 2013

Chicken Afritada

It's been cloudy these past four days. Folks in Manila are suffering from flooding due to heavy rains, and most of the classes have been suspended since Tuesday. Here in Davao, we experience scattered rainshowers, but no flooding.

Since it's a cloudy day, a great pick me-up would be a hearty chicken stew to warm both heart and tummy and please the eyes.

Chicken Afritada is a popular special occasion dish. It usually appears during Sunday meals, Fiesta celebrations and parties. It is always on menus for Filipino food and is a crowd pleaser.
Chicken Afritada

I remember growing up, my mom only cooked Chicken Afritada about four or five times in one year. She uses Dumalaga , any native chicken that's about to lay eggs, and so the stew would bear underdeveloped eggs that are basically just yolks, in various sizes. I didn't even mention how we looked forward to the rare times she served these.
Dumalaga=young lady chick, not quite a hen yet

When it was my turn to be mom, I decided to serve this dish at least once weekly. I thought, why designate such a delicious dish to just a few, rare appearances, when it is so easy to make and so freakin' delicious?

The kids agree, and they love this for lunch, dinner and for packed lunches. Matter of fact, when guests come over, they know I'll be serving these. The dish looks like you fussed, with the taste and the common knowledge that this is special occasion dish. But then, that will now be your secret, like it is mine.

So get ready for a most delicious fiesta fare right in your own kitchen, and wow guests for picnics with this authentic Filipino dish.


The sauce is to die for, so make sure to include at least 3 cups.

If you wish, you can use one whole native chicken, cleaned, cut up into serving pieces and pressure cooked for about 35 minutes. Cool until the pressure cooker can be opened, before starting on the dish. This means you might need another hour's head start to get the dish done on time.

If pressed for time, however, use a spring chicken, or dressed chicken breasts. For this recipe, I used one and a half chicken breasts. Use chicken fillets when making these for the elderly and very young children.

Lets' cook!

INGREDIENTS:
Afritada ingredients

1 pound or 500 g chicken breasts, cut into serving pieces
3 potatoes, peeled and quartered
1 carrot, sliced
1 red and 1 bell pepper, sliced
1 clove garlic, minced
1 small onion, sliced
1 tomato, sliced
salt and pepper to taste
1/2 cup green peas
1/2 cup pineapple chunks in syrup
1/4 cup breadcrumbs
1-2 tsp all purpose seasoning
2-3 T. tomato paste or 1 150 ml pouch tomato sauce

PROCEDURE:

1. Saute garlic, onions and tomatoes, add the chicken pieces and sprinkle salt on the meat. Toss to make sure the sauteed vegetables get their flavor into the meats. Cover and cook for about 5 minutes in medium heat.

2. The meat shall be cooking in its own juices. Add 2-3 cups water or the stock from which they were previously cooked in ( if using boiled, native chicken). Cover and cook further about 15-20 minutes.


3. Season with pepper and all purpose seasoning. Add the potatoes, carrots, pineapple, pineapple syrup and tomato paste. Add more to achieve the right red-orange color. Cook until vegetables are just tender.

4. Add the green peas and bell peppers. Taste your dish, the pineapple syrup should have added a hint of sweetness to the sauce. Adjust the seasonings, adding more salt or a little white sugar if the tomato paste is too sour. The dish should sport a sweet-salty-umami taste.

5. Add the breadcrumbs, boil until sauce just thickens, remove from fire and serve hot with steamed rice.

Easy Chicken Afritada
Enjoy!